Are you new to Cricut? Do you find yourself unsure of how to browse the software that comes with your device? Beginners of Cricut's design space application need to learn the use of several basic tools before they can experiment and play a role in their projects. Acting as part of the basic tools, Weld and Unweld are very useful when pursuing a variety of arts and crafts. If you are a beginner in Cricut Design Space, using welding tools may be a bit confusing. How to unweld on Cricut? How to ungroup on Cricut? What does weld mean on Cricut? What is weld in Cricut? After showing you some basic principles of how to unweld on Cricut, you will have no problems at all!
Many people are using Cricut machines to unleash their creativity and design skills. It offers unlimited possibilities, you can use this machine to create all kinds of wonderful arts and crafts. Cricut Design Space software provides a variety of ways to combine objects and shapes. The three most common methods used to create combinations include weld, group and attach.
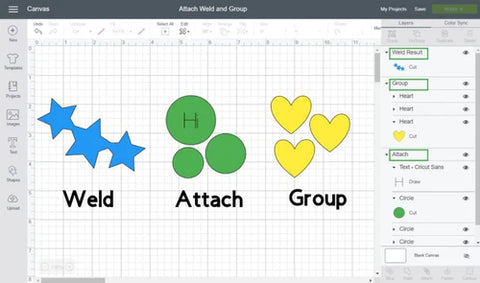
What Does Weld Mean on Cricut?
What does weld mean on Cricut? Welding is a technical term used by Cricut users. Simply put, it is to put two pictures together to form a picture. For example, you created the word "dream" with font X, and then created the word "big" with font Y. These are two different images, if you want to combine them into one picture, you will use the welding function.
But why is welding so important? If the image you see on the screen looks like a big picture, won't it be printed? Well, not exactly. Cricut treats these as separate images, so it cuts them separately. This is why it is important to use the welding function, because it can eliminate the gap between the two images and create a perfect and seamless phrase.
What is the role of welding in the Cricut design space? It allows you to:
1. Combine multiple shapes and layers into a complete single layer image;
2. Remove cutting lines from multiple shapes and cut them into one large image;
3. Concatenate script and cursive text so that it can be cut into a single word instead of a single letter.

So what does unweld mean? Unwelding allows you to separate previously welded materials together. In the given example, the phrase "Dream Big" has been welded together. The unweld function allows you to separate them again, as if nothing happened.
How to Unweld on Cricut?
Many people ask how to unweld on Cricut. The short answer is that there is actually no unwelding function. You cannot take images that have been welded together, and then press the "unwelded" button to separate the images or letters. There is no such function in the Cricut design space.
When you weld something together in Design Space, it will permanently fuse text or images together. Because of this, the first important thing is to figure out when to actually use the welding function, so that you can boast less trouble when trying to unweld. You should only solder them together when you want.
Let's talk about how to unweld on Cricut. As mentioned above, there is no "unweld" button. However, you can take some steps to disassemble the text or image. This is how to unweld the Cricut design space.
1. Before you start converting it to other content, be sure to copy the original text or image. This will optimize your process. After starting the project, just copy it immediately before starting welding, attaching, grouping or any operation!
2. You can save the project before starting to actually work on the project. This will save the original project as a template on the main screen, and you can return at any time if needed. These will be the best choice for you to try to unweld in the Cricut design space.

It may not be possible to unweld the image now, but you can take some measures to ensure that your work will not be ruined by image soldering errors. There are three ways to check this:
1. Create a file backup before starting to edit and weld the image. Save the file as a backup copy, then create a new file and edit it. If you make any mistakes, you can simply import the images from the backup copy.
2. Before starting to weld the image, create another layer which contains a copy of all the images, text and shapes. Set this copied layer to hide and process the original layer. If you make a mistake and cannot unlock the image, make another copy of the duplicated layer and process it.
3. Consider attaching or combining them for your project instead of welding images. If your image or text does not have a separate border color or line to distinguish them, you can use attach instead of welding to connect them together. And the end result is almost the same. When you click the combined images, the attach button becomes a separate button.
How to Attach on Cricut?
As far as the author's concerned, attach is an integral tool of Cricut, enabling to make all of the attached layers together. Everything will be well-organized when sending the project to cut, similar to the design process in Cricut Design Space, it indicates. This tool allows everything to be in place and makes it possible for attributing a layer to a specific cut. As to the detailed instructions on how to attach on Cricut, you should follow as below:
In the first place, there is a need for you to add all of the elements you want to cut in the Cricut Design Space. Ans then any text or scoring lines you're willing to be displayed in your design should be added. When placing the elements in the order, you can select all of them and then click the attach button to complete the process.
However, you should pay attention to the thing that you need to detach or select the specific elements you are prone to change when you think some elements of the attachment should be adjusted for some reason.
How to Ungroup on Cricut?
According to the Cricut Design Space interface, one feature of the application is that you are able to ungroup the objects anytime with just few clicks. All you need to do is to select a group of images on the canvas. You can easily find the ungroup button once clicking the menu of "Arrange", which can be easy to keep track of. Keep in mind the original images and the changed ones separately during this process.
When you fail to select the ungroup button, there are something wrong happened you should be aware. Possibly, you don't have a group selected. At the same time, you may be prone to select a group and an additional image together. In this way, you can see the ungroup button that is colored with gray.


![[Starter Kit] Auto Heat Press Machine 15" x 15" 110V + Starter Kit Bundle](http://www.htvront.com/cdn/shop/files/21_080605f2-5363-49a8-87f9-98c73560a5e9_385x.jpg?v=1713344774)
![[Premium Bundle] Auto Heat Press Machine 15" x 15" 110V + 20 rolls HTV Bundle 12“x3ft + Mini 2 Heat Press Machine + Random Sublimation & HTV Bundle ≥ $180](http://www.htvront.com/cdn/shop/files/1UK_4_385x.jpg?v=1713340288)