


The Cricut Mug Press is a versatile personal beverage innovation that is quickly becoming popular with DIY enthusiasts and small businesses alike. In this comprehensive guide, we dive deep into Cricut Mug Press instructions, giving you a step-by-step guide to setting up your mug press and creating stunning custom designs. Whether you're a seasoned pro or new to sublimation printing, this Cricut Mug Press tutorial will give you the knowledge and skills to make professional-quality custom mugs easily.
Part 1: How Do You Use A Cricut Mug Press?
If you want to make your custom mugs using the Cricut Mug Press or HTVRONT Auto Tumbler Heat Press, you'll need a few things:
Mugs:Pick out plain ceramic mugs of different sizes and styles that you want to personalize.
Vinyl:Use high-quality adhesive vinyl in colors and designs that match your creative vision and are suitable for heat transfer.
Weeding tool:This tool is essential for removing excess vinyl and perfecting your designs for precision.
Cricut Mug Press or HTVRONT Auto Tumbler Heat Press:Choose the device that Suits your preference to transfer the design onto your mug. These machines ensure professional results with ease.
With these items, you can create personalized mugs that reflect your unique style. This guide will walk you through the steps to make your designs come to life on your chosen mug using your selected heat press device.
Here is a step-by-step guide to using the Cricut Mug Press now that you have all the necessary items.
1. To begin making a mug, cut out your design using your Cricut machine and Cricut infusible ink. Remember to mirror your design before cutting.
2. After the design has been cut, remove the unwanted pieces of the design, leaving it on the clear sticky backing.
3. Place the design on your mug and secure it with heat-safe tape if needed.
4. Connect the mug press to your computer in a power source and allow the machine to warm up.
5. Once the machine has warmed up, insert your mug and lower the lever to begin the transfer.
6. The dots on the machine will progressively light up, letting you know how close your mug is to being finished; when the machine beeps, the transfer is complete.
7. Lift the lever and remove the mug, being careful only to touch the handle of the mug as the rest of it will be burning hot.
8. Place the mug on a heat-safe surface and allow it to cool. Once the mug has cooled completely, remove the infusible ink sheet and reveal the design.
Part 2: Differences Between the Cricut Mug Press and the HTVRONT Auto Tumbler Heat Press
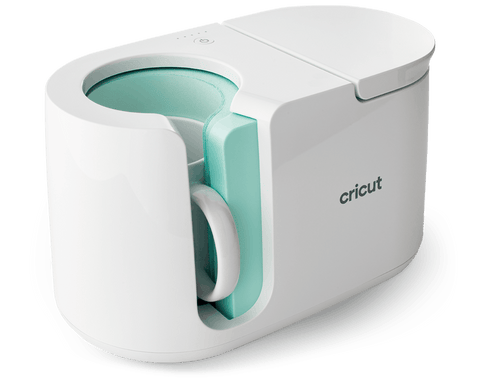
1. The Cricut Mug Press is a bit bigger than the HTVRONT Auto Tumbler Heat Press, as you can see in the picture below.
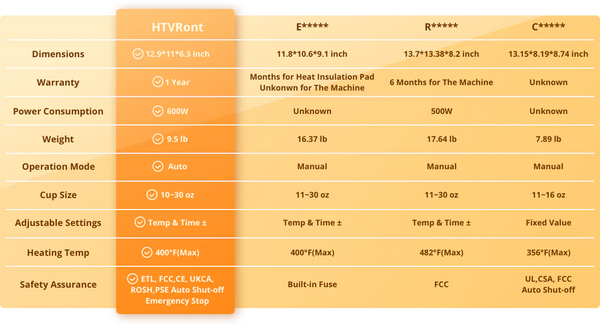
2. The HTVRONT Auto Tumbler Press comes with a 1-year warranty, while the Cricut Mug Press has no warranty at all.
3. The HTVRONT Auto Tumbler Press can customize cups ranging from 10 to 30 oz, while the Cricut Mug Press can customize cups ranging from 11 to 16 oz.
4. The temperature and time settings of the HTVRONT Auto Tumbler Heat Press are adjustable, while the Cricut Mug Press comes with fixed settings.
5. The HTVRONT Auto Tumbler Heat Press has an auto shut-off and emergency stop feature, making it a safer option than the Cricut Mug Press, which only has an auto shut-off.
Part 3: Advantages Of HTVRONT Auto Tumbler Heat Press
1. Suits Various Tumblers and Mugs: A larger heating plate accommodates a wider range of drinkware, including mugs, tumblers, glasses, cups, water bottles, and sippy cups.
2. The Longer Heat Plate For More Tumblers and Mugs:The longer heating plate allows for the customization of multiple tumblers or mugs simultaneously.
3. Adjustable Heat Settings:It features an LCD screen and a setting button, allowing you to monitor and adjust the temperature and time.
4. Freely Adjust Temp and Time:The Setting button allows you to adjust temperature and time according to your needs freely.
5. High-Security Feature:This device has an intelligent feature that automatically shuts it down after 15 minutes of inactivity, ensuring user safety. In case of emergency, it also has a stop function to prevent accidents.
Unleash Your Infinite Creativity with Auto Tumbler Heat Press
- With only one click, HTVRONT Auto Tumbler Heat Press can apply pressure automatically
- Compatible with various mugs, tumblers, glass tumblers,cups, water bottles, and sippy cups.
- LCD screen and setting buttons allowing you to adjust and monitor the temperature and time.

Part 4: Summary
Cricut Mug Press has become a popular tool for both DIY enthusiasts and businesses. In this article, we outline the materials needed for customization and provide a step-by-step guide for using the Cricut Mug Press. Additionally, we highlight the key differences between the HTVRONT Auto Tumbler Heat Press and the Cricut Mug Press and conclude by discussing the benefits of using the HTVRONT Auto Tumbler Heat Press.


![[HTV & Sublimation Bundle] Auto Heat Press Machine 15" x 15" 110V + HTV & Sublimation & Tools Bundle](http://www.htvront.com/cdn/shop/files/21_7_385x.jpg?v=1717572544)
![[Premium Bundle] Auto Heat Press Machine 15" x 15" 110V + 20 rolls HTV Bundle 12“x3ft + Mini 2 Heat Press Machine + Sublimation & Tools Bundle ≥ $188](http://www.htvront.com/cdn/shop/files/21_12_63b46257-76f6-4eba-92df-efd7802b4370_385x.jpg?v=1718966083)


