When it comes to my kitchen, I like to think of it as my battlefield, my world. Like any other room in my house, it is very interesting to decorate. Since I use this space more than any other room in the house, I have always strived to make it feel comfortable, interesting and warm.
I have applied so many interesting designs to it. For example, I have designed a “ Be kind” quote on door with adhesive vinyl and transfer tape. Being kind is not a new concept. It’s very necessary for everyone no matter under what circumstance. So it would be a perfect decoration for me or for everyone who came to my kitchen to remind us of being kind. Of course, “Be kind” is a always an excellent decoration for every rooms, no matter for your bedroom, your kids’ bedroom, your reading room or any other room. This easy beginner craft decorating project adds a splash of color to a plain door and it is definitely a great way to start your day.
Besides that, I also put names on all my spice jars with adhesive vinyl. Print the spice name with a simple black adhesive vinyl and paste it on the jars. Seeing them neatly and uniformly placed on the shelf makes me feel happy. Moreover, I am a very easy-to-forget person. Sometimes I make a mistake with sugar and salt. Since the name was on the jars, I have never spared sugar as salt again. My children and husband love this idea very much. LOL...
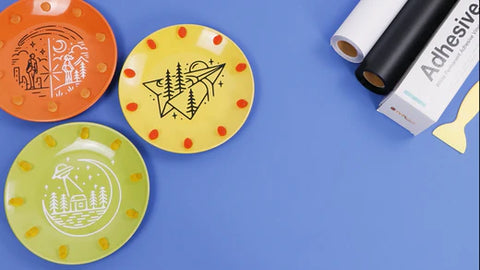
I also make many other kinds of decoration to my kitchen table. This time I am gonna introduce a plate design to be put on the table to be a decoration. They are so adorable that all of my friends who come to my kitchen want to bring one home. LOL. Do you want some cricut plate ideas? Let’s start our tutorial progress.
Here are the supplies you all need:
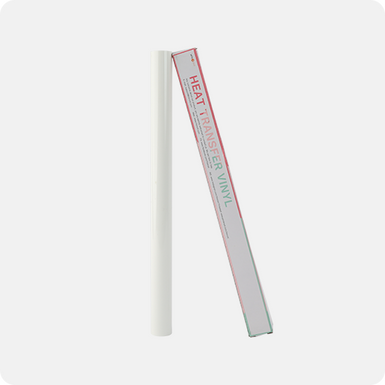
- HTVRONT black adhesive vinyl or white adhesive vinyl
- HTVRONT blue grid transfer tape
- Ikea plates (or any other plates that you like)
- DIY pattern cut file
- Vinyl cutter machine
- Vinyl cutting mat
- Weeding tool
- Scissors
- Squeegee
- Ruler
How to seal vinyl on plates?
Now you are ready to start! Let’s go!
Step 1: Open up the DIY pattern file on computer. Since what I use is cricut, here I am gonna introduce cricut progress. Using ruler to seize the length of your plate to decide how large your vinyl for plates patter is. What I choose is a plane, a photo of girl and boy and a fabulous cabin.
Step 2: Cut a piece of adhesive vinyl for plates from what you prepare
Step 3: Place your adhesive vinyl for plates on a cutting mat. Then, load it to start to cut.
Step 4: Unload the mat. Remove the vinyl sheet. Start to weed extra vinyl with your weeding tool. Using scissors to cut the negative part, leaving your completed pattern on it.
Step 5: Cut a piece of HTVRONT blue grid transfer tape which is a little bit bigger than your whole pattern on adhesive vinyl. Remove the back tape of the HTVRONT blue grid transfer tape. Put the transfer tape on the adhesive vinyl for plates to transfer the pattern away from the original tape to your plate. Go over it with a squeegee and then slowly peel it off.
Step 6: Repeat the above steps to add the remaining 2 patterns to your plates. For my second plate, I added it slightly with a white adhesive vinyl.
Sept 7: After you finish crafting all of your plates. Now it’s time for you to find them a better place to put vinyl on ceramic plate. If you want to use these plates to eat or put food in them, go ahead! They are able to do these. Since HTVRONT adhesive vinyl materials are safe and waterproof, you are able to use these plates to put everything you want or just put on the vinyl on ceramic plate, food safe vinyl for cricut and other cricut plate ideas to be as a decoration.
You’ll definitely be the talk of the neighborhood with this DIY adhesive vinyl kitchen plates design! Hang it on a door, entry way, or even on a wall or place it on your shelf or just use them to put foods. This easy technique can also be used to create designs for other rooms as well as signs with general phrases. What will you create? Please leave a review to tell me what you think of it! As well as your crafting ideas!


![[Starter Kit] Auto Heat Press Machine 15" x 15" 110V + Starter Kit Bundle](http://www.htvront.com/cdn/shop/files/20240425-170634_385x.jpg?v=1714036345)
![[Premium Bundle] Auto Heat Press Machine 15" x 15" 110V + 20 rolls HTV Bundle 12“x3ft + Mini 2 Heat Press Machine + Random Sublimation & HTV Bundle ≥ $180](http://www.htvront.com/cdn/shop/files/1UK_4_22c12b1b-12dd-4105-ac25-93e2faae6a8c_385x.jpg?v=1713863580)