


Heat transfer vinyl is a great material to work with. You can make your own custom shirts, bags, shoes, baby onesies, hats and so much more! If you can iron it, you can add heat transfer to it! There are a lot of tools you can use to work with heat transfer, Let’s tell you how to use heat transfer tools.
How to Apply Heat Transfer Vinyl With Iron?
Do you want to start using HTV but you don’t have a heat press? Don’t worry, you can use a household iron to apply your heat transfer vinyl.

- To begin, you need to take a clear and transparent carrier sheet (Teflon works best)so that you can read the design even after putting it on top of the material. It will protect your clothing from the exposure of intense heating and keep the clothing damage free.
- One of the main reasons that HTV doesn’t always adhere well when you use a household iron is that there was not enough pressure. You’ll want to really put your weight on the iron. Much more pressure is required to press vinyl than to iron clothes. Keep in mind, when you are using a heat press, there are several pounds of pressure used.
- Keep in mind that many irons will not maintain a consistent temperature over the entire surface. Most household irons will get the hottest right in the center. For this reason, you’ll want to make that is the area of the iron that you are using to apply your vinyl.
- If you realize some parts of your transfer aren’t sticking when you are peeling your carrier sheet, just put the carrier sheet back down, and press again.
How to Apply Heat Transfer Vinyl With Heat Press?
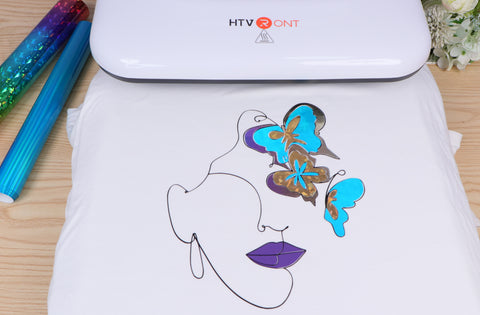
To help you make perfect craft projects every time, here are some tips.
- Press power button to start heating up the machine.
Flip on the power button and adjust the temperature using the up and down arrows.
Application: Preheat 3 seconds
Apply medium pressure at 305 °F for 10-15 seconds
Peel: Cold - Take your shirts or bag and carefully lay it flat on the bottom plate of the heat press, and position the HTV exactly where you want it on the item (backing facing up). Be sure you have weeded off the excess HTV, but leave the clear backing sheet in place.
- Before you pull down the handle and top plate, lay the teflon sheet provided with your heat over the HTV and shirt. When you're ready, pull down the top plate locking it down with the handle. On the model I have, the timer starts automatically, counts down and beeps when it's reached the end of the time.
- At this point, you can unlock the handle, lift up the top plate, remove the teflon sheet and pull out your shirt. You should be able to easily remove the clear HTV backing.
- This final step is optional. I like to flip my garment inside out and re-press it with the heat press to draw the HTV further into the fabric.


![[Starter Kit] Auto Heat Press Machine 15" x 15" 110V + Starter Kit Bundle](http://www.htvront.com/cdn/shop/files/20240425-170634_385x.jpg?v=1714036345)
![[Premium Bundle] Auto Heat Press Machine 15" x 15" 110V + 20 rolls HTV Bundle 12“x3ft + Mini 2 Heat Press Machine + Random Sublimation & HTV Bundle ≥ $180](http://www.htvront.com/cdn/shop/files/1UK_4_22c12b1b-12dd-4105-ac25-93e2faae6a8c_385x.jpg?v=1713863580)


Customer Reviews
The new heating press is wonderful. Watch videos on how to do hoodies & you won’t have any issues doing it….. Turn it sideways. ❤️ My heat press has been getting a workout this holiday season. It was $279 well spent. Get one, you won’t be disappointed.