


If you love crafting with vinyl, you might have heard of Cricut transfer paper. But what is it, and how do you use it? Is it different from transfer tapes?
In this post, we will learn about what Cricut transfer paper is, why you need it, and how to apply it to your vinyl projects. It’s time to master the basics of design transfers and make your vinyl crafts look professional!
Content:
Part 1: What is Cricut Transfer Paper?
Part 2: Cricut Transfer Paper Alternatives
Part 3: Cricut transfer paper instructions
Part 4: How to use Cricut Transfer Paper?
Part 5: Summary and FAQs
Part 1: What is Cricut Transfer Paper?

As you might already know, transfer paper or sublimation paper plays a significant role within the textile industry. It facilitates the transfer of printed images onto desired surfaces.
Usually, you can use an ink-jet printer or other similar printing devices to imprint the images or designs onto the transfer paper. Next, you use a heat press to transfer the imprinted image onto various materials, such as clothing and canvas.
However, Cricut doesn’t actually provide transfer paper. It only sells transfer tape. Before you are confused between the two, transfer tape is also great for transferring images to surfaces. Actually, it is used more widely than transfer paper.
Transfer tape, available in both paper and plastic film forms, is placed atop stickers or vinyl pieces to streamline the cutting and weeding processes. Transfer tape for Cricut simplifies the transferring process of vinyl designs onto the project surfaces.
Part 2: Cricut Transfer Paper Alternatives
So, if you're looking for Cricut heat transfer paper rather than Cricut heat transfer tape, you will have to use an alternative.
Here are some of the best choices proved by sellers with considerable ratings and reviews:
- Best for Dark Fabric: HTVRONT Heat Transfer Paper for T-Shirts
- Best for Light Fabric: Jack Iron-On Heat Transfer Paper for White and Light Fabric
- Best Glowing-in-the-Dark: TransOurDream's Luminous Iron on Heat Transfer Paper 2.0
To learn more about the topic, try these articles:
Top 6 Best Iron-on Transfer Paper for Different Fabric
Difference Between Transfer Paper and Heat Transfer Vinyl
Part 3: Cricut Transfer Tape Instructions
Cricut transfer tape makes putting vinyl designs on your projects super easy. There are a few types of transfer tape for different vinyl, but Cricut uses a clear film with a grid. This type makes it easy to position your design exactly where you want it.
Cricut transfer tape works well with most vinyl types, especially smooth ones. There's also a Linerless version that creates less waste. But if your vinyl is bumpy or textured, like glitter, shimmer, or brushed vinyl, you should go for StrongGrip transfer tape.
Just remember, the StrongGrip Transfer Tape is quite strong, so it's best suited for textured vinyl. For other types of vinyl, stick with the regular transfer tape to get the best results.
When you decide to try the Cricut transfer tape, adequate preparation is key. Make sure you have prepared these items beforehand:
- Prepped and weeded vinyl, all set for transfer.
- Your choice of Transfer Tape or StrongGrip Transfer Tape.
- A scraper or another suitable burnishing tool.
Now, when it comes to the application of the transfer tape, you need to know that there are also slight differences between transfer tape with a liner and linerless transfer tape. It lies in the initial steps of attaching the tape to the design and the process of unrolling the tape for larger designs.
Using linerless transfer tape, you don’t need to peel off a liner before applying the tape to the design. It involves directly covering the design with the tape from the roll.
Additionally, the approach to applying tape for larger designs is different. Linerless tape requires careful unrolling to cover the entire design without the use of a separate liner.
After you've grasped these concepts, you're ready to delve more into using Cricut transfer tape and applying it to your project surface!
Part 3: How to Use Cricut Transfer Paper?
So, are you ready to experiment using transfer tape now? Since transfer paper for Cricut is not available yet, you can still use its transfer tape.
If you've got your artistic inspiration flowing and your project materials all set up, then you're ready to start unleashing your craftsmanship with Cricut transfer tape. The steps are easy, simple, and beginner-friendly. Here's an official guide for you:
Also, see how you can use Cricut transfer tape:
Step 1: Prepare Your Workspace
Make sure you have your weeded vinyl design and the necessary tools: Cricut Transfer Tape, a scraper or burnishing tool, and your project surface.
Step 2: Remove the Backing
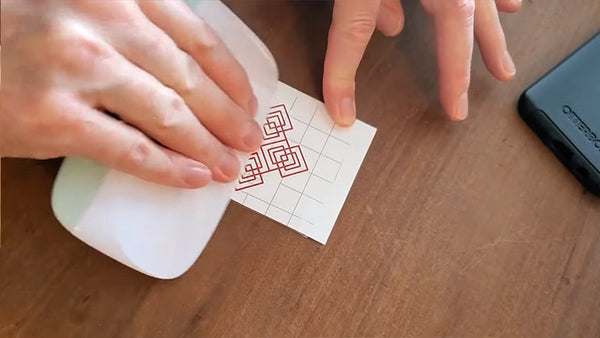
Carefully peel the backing off the transfer tape, exposing the sticky side. Then, hold the Cricut transfer tape above your vinyl design, sticky side facing down. Align it over the design, ensuring it covers the entire image.

Step 3: Burnishing
Use your scraper or burnishing tool to firmly press and smooth the transfer tape onto the vinyl design. This step ensures a strong bond between the vinyl and the transfer tape.
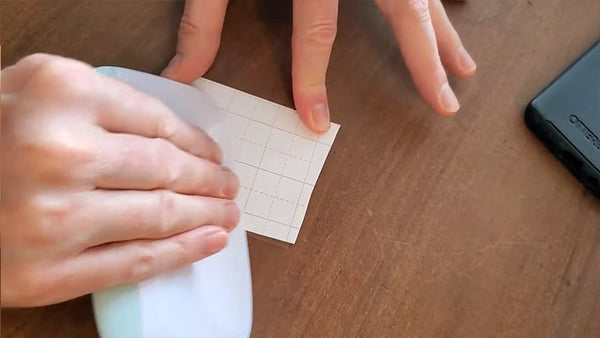
Step 4: Flip and Burnish Again
Gently turn the setup over so the sticky side of the transfer tape faces down. Apply some pressure with the scraper to burnish the back side of the transfer tape.
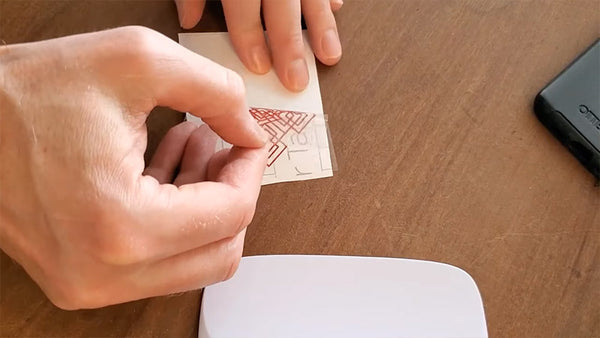
Step 5: Peel off the Transfer Tape
Starting at one corner, slowly and steadily peel off the Cricut transfer tape at a slight angle. The vinyl sticker should ideally come off with the transfer tape. If any parts stick to the backing, gently press them down or go back to burnishing before continuing.
Step 6: Adjust as Needed
If certain areas of the vinyl design didn't lift with the Transfer Tape, carefully press them down and then re-peel the Transfer Tape. Otherwise, you can reapply the Transfer Tape and burnish those areas again.
As you continue peeling the Transfer Tape, the vinyl sticker should come away cleanly. Take your time to ensure the entire design has been transferred to the Transfer Tape.
Part 4: Summary and FAQs
As we reach the conclusion of this article, let me remind you again that Cricut actually only offers transfer tape. As of now, the transfer paper for Cricut is not yet available. Despite this, transfer tape also works as a versatile tool in vinyl crafting, enabling the seamless transfer of printed images onto a wide range of surfaces.
Different from transfer paper, transfer tape is available in paper or plastic film forms. It is designed to streamline the process of placing intricate vinyl designs onto projects.
Using Cricut's transfer tape can seriously level up your crafting game. This opens the door to a broader world of creative possibilities. So go on, get crafty and let your imagination run wild!
FAQs:
1) How do I choose the right Cricut transfer tape for my vinyl project?
Choosing the right Cricut transfer tape for your vinyl project depends on a few factors. Firstly, consider the type of vinyl you're using. If you're working with smooth vinyl, the regular Cricut transfer tape should work well. However, if your vinyl is textured or bumpy, like glitter or shimmer vinyl, you might want to opt for the StrongGrip transfer tape, as it provides better adhesion.
Next, think about the size of your design. If you're working on a larger project, you might prefer the Linerless version of the transfer tape, as it eliminates the need to peel off a liner before applying the tape to your design. But if you're working on smaller or more intricate designs, regular Cricut transfer tape with a liner might be more suitable.
2)How do I remove Cricut transfer tape from my final surface without damaging it?
Tips to remove Cricut transfer tape from your project without harming it: be careful. Start by peeling the tape gently at a slight angle, using soft pressure and rolling if needed. If the vinyl design lifts, press them back onto the surface before continuing.


![[HTV & Sublimation Bundle] Auto Heat Press Machine 15" x 15" 110V + HTV & Sublimation & Tools Bundle](http://www.htvront.com/cdn/shop/files/21_7_385x.jpg?v=1717572544)
![[Premium Bundle] Auto Heat Press Machine 15" x 15" 110V + 20 rolls HTV Bundle 12“x3ft + Mini 2 Heat Press Machine + Sublimation & Tools Bundle ≥ $188](http://www.htvront.com/cdn/shop/files/21_12_63b46257-76f6-4eba-92df-efd7802b4370_385x.jpg?v=1718966083)


