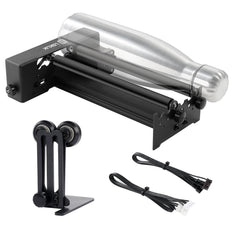
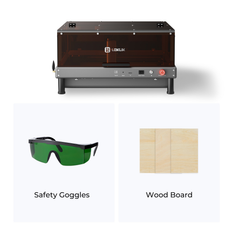
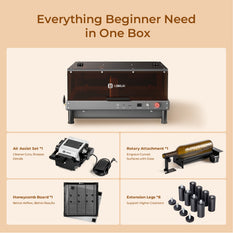
Laser Engraving Machine

LOKLiK Laser Engraving Machine uses a high-powered laser beam to etch designs, text, or patterns onto materials like wood, metal, glass, and plastic. Ideal for crafts, industrial marking, and personalized gifts, it offers precision, speed, and versatility. 

LOKLiK Laser Engraving Machine is ideal for crafts, industrial marking, and personalized gifts. It offers precision, speed, and versatility.

Filter:
  • $399.99 Regular price
    Regular priceSale price
    $399.99 $599.99
  • $25.99 Regular price
    Regular priceSale price
    $25.99 $39.99
  • $11.99 Regular price
    Regular priceSale price
    $11.99 $19.99
    • 30pcs
    • 60pcs
  • $39.99 Regular price
    Regular priceSale price
    $39.99 $49.99
  • $79.99 Regular price
    Regular priceSale price
    $79.99 $89.99
  • $39.99 Regular price
    Regular priceSale price
    $39.99 $49.99
  • $89.99 Regular price
    Regular priceSale price
    $89.99 $99.99
  • $26.99 Regular price
    Regular priceSale price
    $26.99 $36.99
  • $399.99 Regular price
    Regular priceSale price
    $399.99 $599.99

Laser Engraving Machine FAQs

How to use a laser engraving machine?

1 Design Preparation

Start by creating or importing your artwork into the laser engraving software. Popular options include LightBurn, LaserGRBL, or the proprietary software that came with your machine. Supported file formats typically include SVG, DXF, AI, PDF, and BMP. Adjust the design size, position, and orientation to match your material. Use the software's preview function to simulate the engraving path and identify any potential issues before you start cutting.

💡 LOKLiK iEngrave + IdeaStudio — For an even simpler workflow, the LOKLiK iEngrave works seamlessly with HTVRONT's IdeaStudio software. Simply import any image (JPG, PNG, SVG) and use the built-in editing tools to adjust size, position, and design elements. The intuitive interface automatically translates your design into engraving instructions, eliminating the need for complex manual settings — great for beginners.

Cross-Device Compatibility — IdeaStudio isn't just for laser engraving. It also supports HTVRONT's DTF Printer and Vinyl Cutter, so you can design once and choose your output method — print, cut, or engrave — all from the same software ecosystem.

2 Machine Setup
  • Secure the Material: Place your material (wood, acrylic, leather, etc.) firmly on the engraving bed. Use tape, magnets, or clamps to prevent any movement during the process.
  • Adjust the Focus: Proper focus is critical for a clean engraving. Use the manual focus tool (often a small metal block) provided with your machine. Place it between the laser head and the material, then lower or raise the laser head until it just touches the tool. For machines with auto-focus, simply press the auto-focus button.
  • Set the Origin: Define the starting point for the laser head. This is usually done by using the directional controls in your software to move the laser head to the desired position (often the bottom-left or top-left corner of your design), then clicking "Set Origin" or "Home" in the software.
3 Configure Engraving Parameters

This is where you control the depth and quality of the engraving. The two key parameters are:

  • Power: Determines the laser's intensity. Higher power is needed for deep cuts or harder materials, while lower power is used for delicate engraving to avoid burning.
  • Speed: Controls how fast the laser head moves. Slower speeds result in deeper and darker engravings, while faster speeds are used for lighter surface marking.
Common Starting Points:
Material Power Speed Notes
Wood (Basswood) 30–50% 300–500 mm/min Start low and adjust
Acrylic 20–30% 300–400 mm/min Use air assist to prevent flaming
Leather 40–60% 200–300 mm/min Use lower power for delicate details
Glass 10–20% 100–200 mm/min Apply a thin wet paper layer for better results
💡 Always run a small test engraving on a scrap piece of the same material to fine-tune these settings.
4 Run the Engraving Job
  • Double-check that the material is secure, the focus is set, and the origin is correct.
  • Close the lid or safety cover of the machine to activate the interlock.
  • Click "Start" or "Send" in the software to begin the job.
  • Stay with the machine during operation. Monitor the process for any signs of smoke, fire, or material shifting. Keep a fire extinguisher (Class C or multi-purpose) nearby as a precaution.
5 Post-Processing and Cleanup
  • Wait for the material to cool down completely before handling.
  • Remove the engraved piece from the bed. Use a soft brush or compressed air to clean off dust, debris, and any residue left from the engraving.
  • For materials like wood or acrylic, you can apply a finish (e.g., wood oil or clear coat) to enhance the contrast and protect the engraved area.
⚠️ Critical Safety Rules
  • Always wear laser safety goggles rated for the wavelength of your machine (e.g., 450nm for diode lasers).
  • Ensure adequate ventilation in your workspace. Use an exhaust fan or fume extractor to remove harmful gases and particulates.
  • Never leave the machine running unattended — fire hazards are a real risk.
  • Keep the lens clean and check for any smoke residue after each use. A dirty lens reduces power and can cause uneven engraving.
Quick Reference Checklist
☐ Safety goggles on?
☐ Ventilation system on?
☐ Material secured and flat?
☐ Laser head focused?
☐ Origin point set?
☐ Power/speed settings tested?
☐ Fire extinguisher nearby?
Following these steps will help you achieve consistent, high-quality engravings while keeping your workspace safe. Happy engraving!

What is the best laser engraving machine?

The short answer: it depends entirely on what you plan to make. There is no single "best" laser engraver — the right choice is the one that matches your primary materials, budget, and project scale.

To help you decide, here is a breakdown of the three main laser types and who they are best suited for:

Laser Type Best For Example Machines Price Range
Diode Laser Wood, leather, acrylic, paper — hobbyists & beginners LOKLiK iEngrave, Other popular diode models $300 – $1,500
CO₂ Laser Wood, acrylic, glass, leather, fabric — serious hobbyists & small business Various CO₂ laser models from leading brands $1,500 – $8,000+
Fiber Laser Metals, stainless steel, aluminum — industrial & professional use Industrial fiber laser systems $2,500 – $15,000+
1 Diode Laser — Best for Beginners & Hobbyists
  • Strengths: Affordable, compact, low power consumption, easy to set up. Great for wood burning, leather engraving, paper cutting, and acrylic marking.
  • Limitations: Slower than CO₂ lasers, cannot engrave glass or metals directly (some can mark coated metals).
  • Top Pick: LOKLiK iEngrave — a 10W diode laser with 0.02mm precision and speeds up to 30,000 mm/min, capable of cutting up to 8mm basswood or 3mm acrylic in a single pass. It cuts and engraves over 300 materials, including wood, leather, slate, coated metals, and non-transparent acrylic.

    The Cover Edition meets Class 1 laser safety standards with fire/tilt/overheat sensors, an emergency stop, and a protective enclosure that contains smoke and fumes — ideal for home use. Operation is surprisingly quiet (42–64 dB), and the built-in exhaust fan can vent fumes outdoors.

    Software-wise, it works with the LOKLiK IdeaStudio app (mobile and PC), which offers a library of pre-made designs and suggested settings for different materials — making it especially beginner-friendly. It also supports LightBurn for more advanced control.

    💡 Available in two versions: with or without the protective cover.
  • Alternative: Other well-known diode laser models with various power options (5W to 20W) and strong community support.
2 CO₂ Laser — Best for Serious Hobbyists & Small Business
  • Strengths: More powerful, faster, works on a wider range of materials — including wood, acrylic, glass, leather, rubber, and fabric. Can also cut thicker materials.
  • Limitations: Larger footprint, requires more maintenance (mirrors, lens cleaning, water cooling), higher cost.
  • Top Pick: User-friendly CO₂ laser models with cloud-based software, excellent for home-based businesses. For more industrial-grade, consider established CO₂ laser manufacturers known for reliable performance and good value.
3 Fiber Laser — Best for Professional & Industrial Use
  • Strengths: Specialized for metal engraving and marking — stainless steel, aluminum, brass, copper, and anodized materials. Extremely fast, high precision, long lifespan (50,000+ hours).
  • Limitations: Expensive, less versatile (not ideal for wood or acrylic), requires ventilation for metal fumes.
  • Top Pick: Popular entry-level fiber laser systems with 20W–50W options. For higher production, consider advanced fiber laser sources known for color marking on metals.
🔍 How to Choose the Right One for You

Ask yourself these three questions:

  • What materials do I engrave most? → Wood/acrylic = CO₂; Metals = Fiber; Mixed materials on a budget = Diode (with limitations).
  • What is my budget? → Under $1,500 = Diode; $1,500–$8,000 = CO₂; Over $8,000 = Fiber.
  • What is my skill level and workspace? → Beginner with limited space = Diode; More experienced with dedicated workspace = CO₂ or Fiber.
✨ Quick Recommendation
Budget: LOKLiK iEngrave or other entry-level diode lasers
Versatility: Popular CO₂ laser models
Metal Engraving: Entry-level fiber laser systems
Best Value: Well-regarded CO₂ laser series

The "best" laser engraving machine is the one that fits your workflow. Start with your most common material, then choose a machine that can grow with you.

What is a laser engraving machine?

A laser engraving machine is a computer-controlled tool that uses a highly focused beam of light to remove material from the surface of an object, creating permanent marks, designs, or cuts.

Think of it like a high-precision printer, but instead of ink, it uses a laser to burn, melt, or vaporize the material's surface. The result is a crisp, durable, and highly detailed engraving that won't fade, peel, or wash away.

⚙️ How Does It Work?

The machine directs a powerful laser beam onto the material's surface. The energy from the laser heats the material to the point of vaporization or melting, removing a microscopic layer to reveal the desired design.

The entire process is controlled by software (such as LightBurn or LOKLiK IdeaStudio) that translates a digital design — like an SVG, PNG, or DXF file — into precise movements of the laser head across the material. It's a combination of optics, mechanics, and digital design working in perfect synchronization.

What Can You Make With a Laser Engraver?

Laser engraving machines are incredibly versatile. Here are just a few examples:

  • Personalized Gifts — custom wooden keychains, engraved leather wallets, monogrammed cutting boards, and photo-etched slate coasters.
  • Industrial Marking — serial numbers on metal parts, barcodes on plastic housings, or logos on stainless steel tools.
  • Arts & Crafts — detailed paper cutouts, leather bookmarks, acrylic signage, and unique jewelry pieces.
  • Small Business Products — custom-branded merchandise, award plaques, and personalized promotional items.
🔦 Different Laser Types for Different Materials

Not all lasers are the same. The three main types are:

  • Diode Lasers — Best for wood, leather, acrylic, and paper. Affordable and great for beginners. Example: LOKLiK iEngrave, xTool D1 Pro.
  • CO₂ Lasers — Best for glass, fabric, rubber, and thicker wood. More powerful and versatile. Popular for small businesses.
  • Fiber Lasers — Best for metals (stainless steel, aluminum, brass, etc.). Fast, precise, and designed for industrial or heavy-duty use.

💡 Choosing the right type depends entirely on what you plan to engrave. See our “Best Laser Engraving Machine” guide for a detailed comparison.

Why Choose a Laser Engraving Machine?
  • Permanent & Durable — Engravings won't fade, peel, or wear off over time.
  • High Precision — Achieve incredibly fine details, even on small or complex designs.
  • Fast & Efficient — Complete a project in minutes, from custom signs to batch-produced parts.
  • Versatile — Work with a wide range of materials, from wood and leather to metal and acrylic.
  • Beginner-Friendly Options — Modern machines like the LOKLiK iEngrave offer simple software, safety features, and plug-and-play setup, making laser engraving accessible to everyone.
🛡️ Safety First

Laser engraving is safe when proper precautions are taken. Always:

  • Wear laser safety goggles rated for your machine's wavelength.
  • Operate with adequate ventilation to remove fumes and smoke.
  • Never leave the machine unattended while running.
  • Choose machines with built-in safety features (like the LOKLiK iEngrave Cover Edition's protective enclosure, fire/tilt/overheat sensors, and emergency stop button).

Whether you're a hobbyist, a small business owner, or an industrial manufacturer, a laser engraving machine can unlock endless creative and commercial possibilities — turning your digital designs into physical reality.

Is it worth buying a laser engraving machine?

Yes — but only if it aligns with your goals and usage habits. A laser engraving machine can be an incredibly rewarding investment, offering precision, creativity, and business potential. However, whether it's "worth it" depends on a few key factors.

🎯 Who Benefits Most From a Laser Engraver?
  • Small Business Owners — Offer custom products like branded merchandise, personalized gifts, award plaques, and etched drinkware. A laser engraver can become a revenue stream, paying for itself in months.
  • Hobbyists & Makers — Create unique handmade items, explore creative projects, and level up your DIY skills. For frequent crafters, the convenience of in-house engraving saves time and expands possibilities.
  • Industrial & Commercial Users — For permanent part marking, serialization, and barcoding, a fiber laser is an essential tool for compliance and traceability.
  • Etsy & Online Sellers — Stand out in the personalized gift market. With the right machine and designs, you can produce high-quality, professional-grade products from home.
📋 What to Consider Before You Buy

To determine if a laser engraver is a smart investment for you, ask yourself these questions:

1
How often will you use it?

If you plan to use it weekly or daily for business or regular projects, the investment is justified. Occasional use may be better suited to outsourcing or a more affordable entry-level machine.

2
What materials will you engrave?

Wood, leather, and acrylic → diode laser (budget-friendly). Metal marking → fiber laser (higher investment). Wide material range → CO₂ laser (mid-to-high range). Choosing the right type saves you from under- or over-investing.

3
What is your budget?

Entry-level diode lasers start around $300–$500 (e.g., LOKLiK iEngrave). CO₂ lasers range from $1,500–$8,000+. Fiber lasers are $2,500+. Factor in accessories, ventilation, and software costs as well.

4
What is your ROI timeline?

For businesses, calculate how many orders it will take to cover the machine cost. For hobbyists, consider the value of time saved, creative satisfaction, and unique projects you can create.

When Is It Worth It?
  • You have a clear use case — personalized gifts, branded products, or industrial marking — that matches the machine's capabilities.
  • You'll use it frequently enough to justify the cost (e.g., at least 2–3 times per week for business, or regularly for creative projects).
  • You value convenience and control — owning a machine means faster turnaround, no outsourcing delays, and full creative freedom.
  • You have space and ventilation to set up safely and comfortably.
⚠️ When Might It Not Be Worth It?
  • You only need one or two engraving projects — outsourcing to a local shop or online service may be cheaper.
  • You're unfamiliar with design software and not ready to invest time in learning — though modern machines like the LOKLiK iEngrave offer user-friendly apps to lower the learning curve.
  • You have very limited workspace or no ventilation — safety and air quality are non-negotiable.
📊 Quick ROI Estimate

Here's a rough example for a small business use case:

  • Machine cost (entry-level diode): $400–$600
  • Average profit per personalized item (e.g., engraved keychain or coaster): $10–$20
  • Orders to break even: 20–60
  • Estimated payback period: 2–4 months with a steady stream of orders

💡 This is a simplified estimate — actual numbers depend on your pricing, material costs, and order volume.

✨ Final Verdict

For small business owners, Etsy sellers, and serious hobbyists — a laser engraving machine is absolutely worth it. It turns creativity into tangible products, offers long-term cost savings over outsourcing, and opens new revenue streams.

For casual users or those with limited usage, it may be better to start with a budget-friendly diode laser like the LOKLiK iEngrave (starting around $300–$500) — it lowers the entry cost while still delivering professional-quality results.

Ultimately, the decision comes down to your goals, budget, and willingness to learn. For the right person, a laser engraver is not just a tool — it's a gateway to endless creative and commercial possibilities.

Is laser engraving difficult?

Not at all — laser engraving is surprisingly beginner-friendly, especially with modern machines designed to simplify the process. However, the learning curve depends on the complexity of your projects.

Think of it like learning to use a new smartphone or a digital camera: there are basic functions you can master in minutes, and advanced features that take time to explore. With laser engraving, simple designs are easy, and complex projects become manageable with practice.

1 What Makes Laser Engraving Easy for Beginners?
  • Modern Software Does the Heavy Lifting — Programs like LightBurn, LaserGRBL, or LOKLiK IdeaStudio handle most technical settings. Many offer design libraries, pre-set material parameters, and one-click engraving options.
  • Plug-and-Play Machines — Newer models like the LOKLiK iEngrave come with pre-calibrated focus tools, auto-power detection, and clear setup guides — virtually no assembly required.
  • Rich Learning Resources — Thousands of YouTube tutorials, online courses, and community forums are available. You can often find step-by-step guides for almost any project or material.
  • Instant Feedback — Unlike traditional crafts (woodworking, painting), you see results immediately. This rapid feedback loop helps you learn what works and what doesn't, fast.
2 The Learning Curve: Simple vs. Complex Projects
Simple: Easy to Start
  • Engraving pre-made designs (logos, text, clipart) onto wood, leather, or acrylic — learn in 10–15 minutes.
  • Cutting shapes like keychains, coasters, or tags — learn in 30 minutes.
  • Working with common materials using recommended settings — learn in 1 hour.
★★
Advanced: Requires Practice
  • Creating multi-layer engravings or 3D reliefs — days to weeks of practice.
  • Optimizing settings for unusual materials (e.g., marble, coated metals, foam) — requires trial and error.
  • Designing original artwork and adjusting for material behavior — skill development over time.
3 Common Challenges (and How to Overcome Them)
  • Finding the Right Settings — Start with the manufacturer's recommended settings for each material, then do test engravings on scraps. Many machines (like LOKLiK iEngrave) include a built-in material setting library to take the guesswork out.
  • Design Software Learning — You don't need to be a graphic designer. Start with ready-made SVG files (available free online) and simple text engravings. Gradually experiment with design tools as you gain confidence.
  • Material Handling — Different materials react differently to heat and focus. Use the manual focus tool or auto-focus feature religiously, and always test on scrap before running final projects.
💡 Tips for Fast Learning
  • Start Simple — Practice with small, one-color designs before attempting complex multi-layer projects.
  • Keep a Material Log — Record the settings (speed, power, focus height) that work best for each material. This becomes your personal reference guide.
  • Join a Community — Online forums, Reddit groups, and Facebook communities are great for troubleshooting and inspiration. You'll find that most issues have already been solved by others.
  • Embrace Mistakes — Every wrong setting or misaligned design is a learning opportunity. Cheap materials like paper or thin cardboard are great for low-cost testing.
4 How Does Laser Engraving Compare to Other Crafts?
  • Easier than Woodworking — No need for complex joinery, sanding, or finishing. The machine does the cutting for you.
  • Faster than Hand Engraving — A laser can engrave a design in seconds that would take hours by hand.
  • More Consistent than Painting — No brush strokes, no smudging — just precise, repeatable results.
  • Similar to 3D Printing — Both use software to control a computer-driven tool, but laser engraving is generally simpler because it operates on 2D surfaces.
✨ The Bottom Line

Laser engraving is not difficult to start, but it rewards curiosity and practice. With today's machines (like the LOKLiK iEngrave) offering beginner-friendly software, safety features, and setup support, anyone can achieve professional-looking results in their first session.

The key is to start simple, learn gradually, and keep experimenting. The learning curve is gentle, and every project you complete will teach you something new — making laser engraving one of the most accessible entry points into digital fabrication.

HTVRONT reserves final interpretation rights for this event.