Introduction
Color changing vinyl is one of the most delightful materials in the craft world — a material that transforms right before your eyes when the temperature shifts. Pour a hot drink into a decorated mug, and the design changes color. Run cold water over a water bottle, and a hidden message appears. It's interactive, playful, and guaranteed to get a reaction from anyone who sees it.
In this guide, we'll cover everything you need to know: what color changing vinyl is, how the two types (cold and hot) behave differently, which surfaces it works on, and how to cut, weed, and apply it like a pro. If you're new to adhesive vinyl in general, our beginner's guide to vinyl crafts is a great place to start.
📚 Table of Contents
What Is Color Changing Vinyl?
Color changing vinyl is a type of adhesive vinyl that shifts its color when exposed to a temperature threshold, then returns to its original color at room temperature. It's made with special thermochromic pigments embedded in the vinyl, which respond to heat or cold by altering how they reflect light.
This makes it perfect for interactive projects: a coffee mug that reveals a design when filled with hot liquid, a water bottle that changes color when iced, or a party cup that transforms with the temperature of the drink inside. It's a small touch that makes a project feel genuinely magical.

The Two Types: Cold vs. Hot
Color changing vinyl comes in two categories, and choosing the right one depends entirely on what will trigger the change. Here's how they compare:
| Feature |
Cold Color Changing Vinyl |
Hot Color Changing Vinyl |
| Activation Temperature |
Below 15°C / 59°F |
Above 45°C / 113°F |
| Returns to Original At |
Warmer temperatures (room temp) |
Cooler temperatures (room temp) |
| Best For |
Iced drinks, cold water bottles, refrigerated items |
Coffee mugs, tea cups, hot drink tumblers |
| Available Transitions |
White→water blue, beige→yellow, white→rose red, yellow→green, rose red→purple, translucent→blue |
Blue→green, red→yellow, purple→rose red |
Cold color changing vinyl is ideal for projects that will be exposed to ice water or refrigeration — think water bottles, glasses, or even windows in winter. Hot color changing vinyl is perfect for coffee mugs, tea cups, and anything that regularly holds hot liquids.

How Does Color Changing Vinyl Work?
Color changing vinyl reacts to the temperature of the surface it's applied to — not the air around it. This distinction matters. If you apply hot color changing vinyl to a mug and pour hot coffee inside, the mug's surface heats up, triggering the vinyl's color shift. Similarly, cold color changing vinyl on a glass will respond when the glass itself cools from iced water.
This is also why thermos cups and vacuum-insulated bottles won't work with color changing vinyl. Those products are designed to prevent surface temperature changes — which means the vinyl never reaches its activation threshold. For the magic to happen, the surface itself must actually get hot or cold.
What Surfaces Can You Use It On?
Color changing vinyl is an adhesive vinyl, which means it's designed for smooth, hard surfaces — not fabric. It bonds beautifully to:
- Mugs and coffee cups
- Glassware and windows
- Ceramic and porcelain
- Water bottles (non-insulated)
- Phone cases and laptops
- Carafes and decanters
For fabric projects, you'll want heat transfer vinyl instead. HTV is specifically designed to bond with textiles under heat and pressure, whereas adhesive vinyl — including color changing varieties — will peel off fabric quickly.

How to Use Color Changing Vinyl
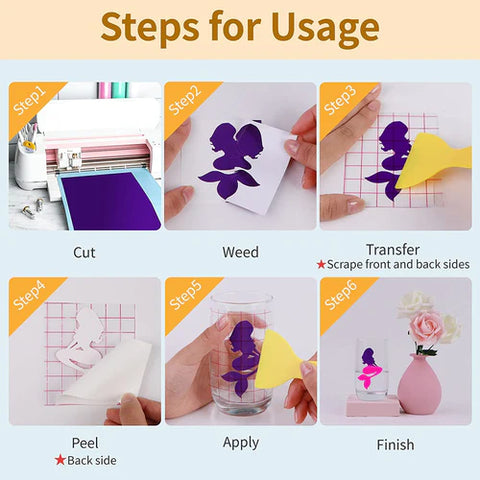
The application process mirrors standard adhesive vinyl — with a few small considerations. Here's the complete workflow:
Step 1: Cut Your Design
Create or import your design in your cutting machine's software. Load the color changing vinyl onto your cutting mat with the colored side facing up. Select a standard adhesive vinyl setting, and send the design to cut. Unlike HTV, you do not need to mirror the design — adhesive vinyl is applied face-up.
Color changing vinyl is compatible with most vinyl cutters, including Cricut, Silhouette, Graphtec, and Brother machines.
Step 2: Weed the Design
Remove the excess vinyl around your design using a weeding hook. For small letters or intricate patterns, switch to fine-tip tweezers. Work slowly — the color-shifting nature of the material can make cut lines slightly harder to see under certain lighting.
Step 3: Apply Transfer Tape
Cut a piece of transfer tape slightly larger than your design. Lay it over the weeded vinyl starting from the center and working outward to prevent air bubbles. Burnish firmly with a scraper to ensure the design lifts cleanly from the backing.
Step 4: Peel and Position
Peel the transfer tape away from the vinyl backing — the design should come with it. Carefully position the design on your surface, making sure it's exactly where you want it. Once it touches, it's difficult to reposition cleanly.
Step 5: Press and Burnish
Press the design onto the surface firmly, then burnish the entire design with a scraper. Pay extra attention to the edges, where lifting is most likely to start. For curved surfaces like mugs, warm the vinyl slightly with a hair dryer to help it conform without creasing.
Step 6: Peel the Transfer Tape
Peel the transfer tape away at a 45-degree angle, pulling straight back — not upward. If the vinyl starts to lift, lay the tape back down, burnish again, and try peeling more slowly.
Quick Application Checklist
Before starting your color changing vinyl project, run through these points:
- ✅ Confirm you've chosen the right type: cold activation for iced drinks, hot for hot drinks
- ✅ Surface is smooth and hard — no fabric
- ✅ Surface is not vacuum-insulated (must change temperature)
- ✅ Design loaded face-up — no mirroring needed
- ✅ Surface cleaned with rubbing alcohol and fully dried
- ✅ Transfer tape burnished from center outward
- ✅ Peel at 45-degree angle, straight back
Troubleshooting Common Issues
Even a simple material can have its quirks. Here's how to handle the most common problems.
Vinyl won't change color
The issue: The design stays the same no matter what temperature you expose it to.
Why it happens: The surface may be insulated, the temperature may not be reaching the activation threshold, or you may have the wrong type (cold vs. hot).
The fix: Test with more extreme temperatures. For cold vinyl, try ice water directly against the surface. For hot vinyl, pour boiling water into the mug. If it still doesn't change, the surface likely isn't conducting temperature — thermos and double-walled products won't work.
Vinyl peeling at edges after a few days
The issue: Corners or edges of the decal lift from the surface.
Why it happens: The surface may not have been cleaned properly before application, or the edges weren't burnished firmly enough.
The fix: Clean the surface again, re-burnish the lifted edge, and let the adhesive cure for 24 hours. For items that are handled frequently, avoid placing designs near high-contact edges like mug handles.
Transfer tape won't release the design
The issue: The vinyl keeps sticking to the transfer tape instead of staying on your surface.
Why it happens: The transfer tape may be too tacky for the vinyl, or the surface wasn't clean enough for the vinyl to grip.
The fix: Burnish the vinyl directly onto the surface before peeling the transfer tape. If the tape is too aggressive, try a lighter-tack transfer tape or peel more slowly at a steeper angle.
Frequently Asked Questions
Can I use color changing vinyl on fabric or shirts?
No — color changing vinyl is an adhesive vinyl, not a heat transfer vinyl. It's designed for smooth, hard surfaces like glass, ceramic, and plastic. On fabric, the adhesive can't form a lasting bond, and the design will peel off quickly. For textile projects, use heat transfer vinyl with a heat press.
Does color changing vinyl need to be mirrored before cutting?
No. Like all adhesive vinyl, color changing vinyl is cut face-up and applied directly to the surface, so mirroring is unnecessary. Only HTV requires mirroring, because it's cut face-down on the carrier sheet and flipped over before pressing. If you're switching between materials, double-check your software settings before cutting.
Is color changing vinyl permanent or removable?
Color changing vinyl is available in permanent adhesive form, and it's designed for long-lasting use. While it's not as easily removable as dedicated removable vinyl, it can still be peeled away if needed — though it may leave some residue on certain surfaces. For temporary projects, removable color changing vinyl varieties may be available depending on your supplier.
How long does the color changing effect last?
The thermochromic pigments in color changing vinyl will gradually lose sensitivity after repeated temperature cycling, but with normal use, the effect lasts for years. Prolonged direct sunlight and frequent exposure to very high heat can accelerate fading of the color-shifting properties. Hand-washing decorated items — rather than using a dishwasher — will also help preserve both the vinyl and its color-changing magic.
Keep Learning
Fascinated by color changing vinyl? These resources will help you master more vinyl techniques:


 Cart Unlocks Add-On Deals








