


The Christmas season is a special time for everyone. However, the kids get so thrilled about the holiday (and Santa’s arrival) that they get a little restless. Meanwhile, as a parent, you must line up a long list of activities to do with your children. And one of our absolute favorites is making DIY Christmas ornaments for kids. So, if you’re looking for some unique DIY Christmas crafts for kids to make this holiday season, we’ve got your back with a list of eight well-researched and fun ideas. Invite your kids to scroll through this list together!
Part 1: What can I DIY Christmas ornaments for kids?
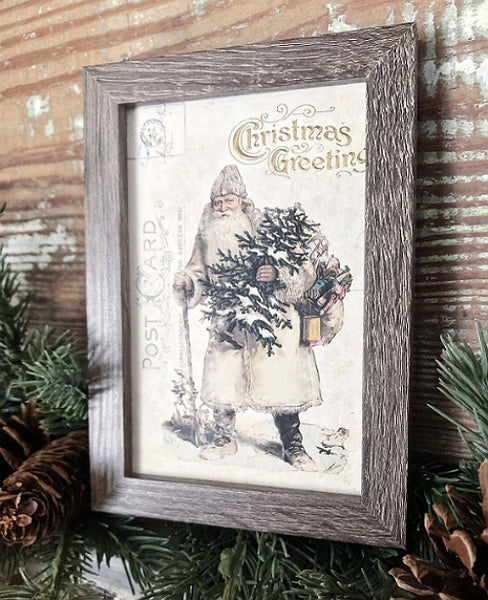
1. Warm Christmas Santa Frame
What you need:
- Shadow Box Frame
- Foam Tape
- HTVRONT White Cardstock Paper
- Vinyl Cutter
What kid wouldn’t want to make a personalized Christmas Santa frame? In this cheap DIY process, get a shadow box frame and foam tape for bonding, attaching, and mounting your project. Then, use your vinyl cutter (we used Cricut Maker) to cut out your Santa design on your White Cardstock Paper. Remember, you can use scissors to cut out Santa and other Christmas shapes for your frame if you don’t have a vinyl plotter. Hurry up and make DIY Christmas crafts for your kids.
2. Merry Merry Merry Christmas Shirts

What you need:
- Cotton shirt
- HTVRONT 3D puff vinyl
- HTV vinyl
- Auto Heat Press
- Vinyl Cutter
3D puff vinyl designs are making a massive comeback after rocking in the 80s. For this project, you’ll need a plain-colored cotton shirt and a Cricut Maker machine to print your design. We used the “Merry Merry Merry Christmas” design with a cute little Christmas tree on the design. Remember to “mirror” your design on Cricut Design Space to prevent it from appearing backwards on the fabric. Also, let the project dry out for at least 24 hours before washing. Making DIY Christmas crafts for kids is a way to express parents' love, so don't waste time and come up with DIY Christmas gifts for your kids.
3. Family Photo Coffee Mug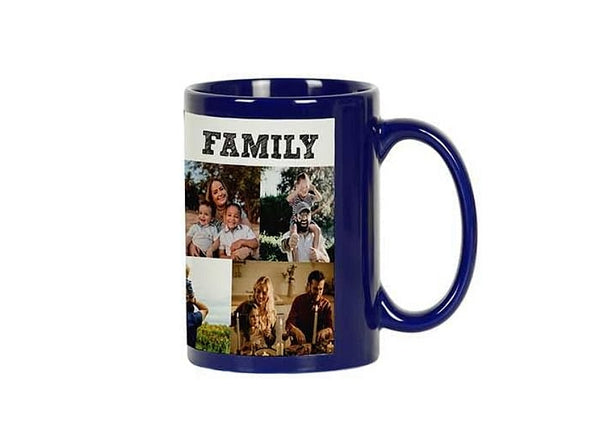
What you need:
- Clear mug
- HTVRONT Holographic Printable Vinyl
- Printer
- Vinyl Cutter
HTVRONT Holographic Printable Vinyl is one of the most versatile products you can use in your DIY Christmas gifts for kids. This vinyl material is great for ceramic, metal, or glass coffee mugs because it doesn’t peel or fade.
Open your family photo on Cricut Design Space and customize it accordingly. Then, place the Holographic Printable Vinyl on your printer and print the design onto it. After that, use your preferred vinyl cutter or scissors to trim the design and apply it to your mug. Be sure to wait for at least 24 hours before use.
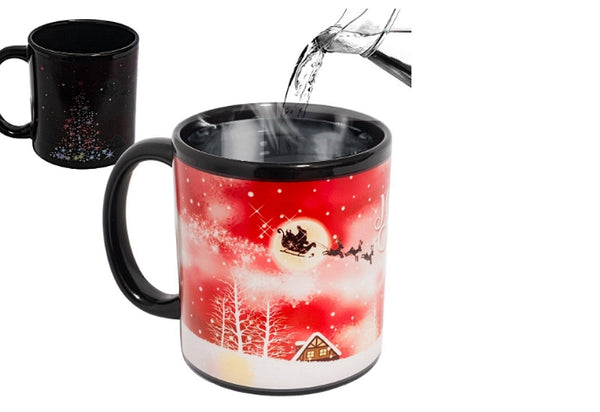
4. Color-Changing Christmas Mug
What you need:
- Clear Mug
- HTVRONT Cold Color Changing Adhesive Vinyl
- Vinyl Cutter
For obvious reasons, your kids will likely prefer using color-changing mugs over the family photo mug. It’s a simple-to-implement DIY project using the HTVRONT Cold Color Changing Adhesive Vinyl, which changes color when the temp is below 15°C/59°F.
Simply cut your Christmas design on Cricut Design Space, weed it, and then use a transfer tape to apply the vinyl design. The color-changing mug will come to life whenever you pour cold liquid into it.
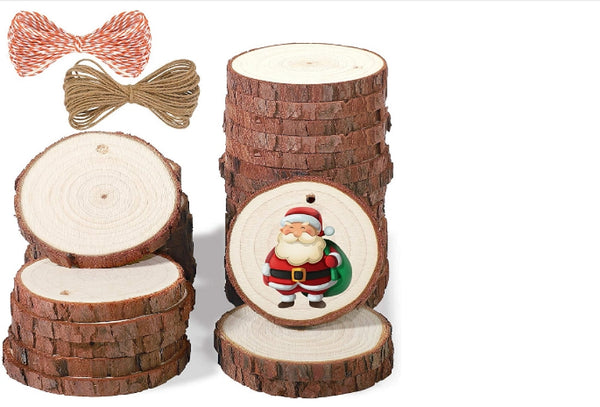
5. Wood Slice Ornaments
What you need:
- Wood Slice Blank
- HTVRONT Clear HTV Vinyl for Sublimation
- HTVRONT Sublimation Paper
- Printer
- HTVRONT Mini Heat Press
- Vinyl Cutter
There are unlimited options when it comes to making wood designs. You can use small, thin wooden slices to make sublimation Christmas designs using HTVRONT Mini Heat Press.
Cut the clear HTV sublimation vinyl to separate the top, then place the slices on the warm heat press. Proceed to cut out the excess vinyl before printing your design and applying it to the wooden slice. Press for around 60 seconds and remove the sublimation paper. That’s it!
6. Snowflake Scarf

What you need:
- Scarf
- Vinyl Cutter
- HTVRONT Heat Transfer Vinyl
- HTVRONT Auto Heat Press
You’ll love this DIY project if your family has a tradition of wearing matching scarf. You can gift everyone around the house a customized scarf with beautiful snowflake designs.
Purchase a scarf, then select and customize your snowflake designs on Cricut Design Space. Now cut your design before weeding and pressing the design onto your scarf with HTVRONT Auto Heat Press at temperatures between 305 and 320℉ for 10-15 seconds.
7. Christmas Gift Tags

What you need:
- Colored Cardstock
- Vinyl Cutter
- Glue
- Ribbon
We all know that kids like to share during the festive season. Therefore, making DIY Christmas cards for kids should feature highly on your to-do list. Gift cards for decorating wrapped presents are quick and easy to make if you have a Colored Cardstock and Cricut machine.
Start by uploading the file to make the gift card holder on Cricut Design Space, then Make It according to your custom preferences. After that, cut the cardstock to make your gift cards in similar or varying shapes. Using glue, stick a rectangular piece at the back of the gift card. This is where your child will leave their message. You can also use a ribbon to create a cute bow.
8. Christmas Wreath
What you need:
- Green leaves
- Pine cones
- Floristry scissors
- Reel wire
- Ribbon
- HTVRONT HTV Vinyl
- Vinyl Cutter
- HTVRONT Auto Heat Press
- Glue
If your family has just moved to a new house and you want to spruce it up this holiday, crafting a door wreath should do the trick. In this project, we’ll create a hoop using the reel wire and then cut a piece of cloth around it. This could be a flannel because of its rich color combination.
Next, upload your SVG Christmas design on Cricut Design Space and cut it. Ensure that the HTV fits nicely on the piece of cloth before pressing with the Auto Heat Press. After transferring the design, trim the excess fabric around the hoop with scissors. Also, glue the outer edge of the material to the hoop to prevent it from fraying and shifting. Lastly, decorate your Christmas wreath with green leaves, pine cones, and a bow.
Part 2: Tips and Techniques for DIY Christmas ornaments for kids?
1. What should I know when making DIY Christmas ornaments for kids?
First, involving your children in every step during the DIY process is vital to make it more fun. This should help you DIY Christmas crafts for kids that will leave everyone happy and smiling. In addition, ensure maximum adult supervision during the DIY sessions to avoid accidental burns with the heat press machines or cuts with weeding tools and scissors. Your child’s safety comes first!
2. Where can I get free SVG files for DIY Christmas ornaments for kids?
If you have some graphic design knowledge, use a professional program like Photoshop to create unique SVG designs for your Christmas DIY for kids. If not, head over to Loklikworkshop.com to explore and download thousands of free SVG designs for any project.
Summary
There you have it! These are some of the coolest Christmas DIY gifts for kids to make this festive season. Always ensure your children are part of the process while maintaining maximum supervision. Remember, you can involve children of any age to make these sweet handmade Christmas ornaments. Have fun!


![[Starter Kit] Auto Heat Press Machine 15" x 15" 110V + Starter Kit Bundle](http://www.htvront.com/cdn/shop/files/20240425-170634_385x.jpg?v=1714036345)
![[Premium Bundle] Auto Heat Press Machine 15" x 15" 110V + 20 rolls HTV Bundle 12“x3ft + Mini 2 Heat Press Machine + Random Sublimation & HTV Bundle ≥ $180](http://www.htvront.com/cdn/shop/files/1UK_4_22c12b1b-12dd-4105-ac25-93e2faae6a8c_385x.jpg?v=1713863580)


